Chapter 9 - Recover a Drive
Online Manual
Frequently Asked Questions
Data Recovery Basics
Chapter 1 - Introduction
Chapter 2 - Evaluation
Chapter 3 - Installation
Chapter 4 - Purchase
Chapter 5 - Activation
Chapter 6 - User Interface
Chapter 7 - Best Power Settings
Chapter 8 - File Recovery
Chapter 9 - Drive Recovery
Chapter 10 - Saving Files
Chapter 11 - Troubleshooting
Chapter 12 - Options
Chapter 13 - Raid Recovery
Chapter 14 - Disk Imaging
Chapter 15 - Customizing GUI
Chapter 16 - Legal
Appendix 1 - Technical Support
Appendix 2 - File Carving
Appendix 3 - References
Appendix 4 - Definitions
Appendix 5 - Icon Key
9.1 When to use Recover Drive
The Recover Drive option is best used when:
- a drive has been formatted;
- a drive has been formatted and Windows reinstalled;
- a Windows recovery or system restore has resulted in a fresh installation of Windows and the previous user created files are missing;
- a drive letter has gone missing;
- the drive is unallocated or RAW in Windows Disk Management and no files can be read;
- Or some other problem has affected the entire contents of the drive.
The Recover Drive search will recover the missing file and folder structure with all file types. Follow the flow chart in conjunction with the instructions below to recover a drive.
START
Run a Recover Drive search when a hard disk has been formatted, is unallocated, RAW, when windows has been reset or reinstalled, corrupt drive or missing drive letter
Check for hardware fault
Does the drive sound normal?
Can you hear the drive spinning?
Is it excessively hot?
Is there an abnormal ticking noise whilst the drive is reading data (a sign of bad sectors)
Loud clicking or grinding noise? STOP!
There is possible physical damage. Power down the drive and seek assistance from a hardware data recovery service.
Check Drive Status
Is the “Disk” listed in Windows > Disk Management?
(Right click on “Computer > Manage > Disk Management).
If Not:
Does the drive have power?
Can you hear the drive spinning>
Check power and connection cables. If the drive is in a USB case, consider removing the drive an trying another case or a direct connection to your pc.
Minimize Disk Usage
Minimize the use of the problem hard disk. Do NOT write to or format the drive. If the disk is your current C: drive, consider connecting the drive to another computer as a secondary drive to run the recovery.
Review Your PC Power Settings
Change PC power settings to “High Performance” for data recovery (see Chapter 7).
Download Recover My Files
Download and install Recover My Files. Preferably install on a different hard disk.(see Chapter 3)
Run Recover My Files
In the wizard window select “Recover Drive”. Click Next.
Select the Hard Disk
In the drive selection window; select the problem Hard Disk (not the drive letter).Click Next.
Select the Search Mode
Do you have common file types on the problem drive (e.g. jpeg, doc, docx, xls, xlsx, avi, zip). If so, select “Automated” mode (this is per-configured to locate the full file and folder structure with all file types).Click Start.
Selected File Types
If the problem drive contains few or no common file types (e.g. only movie or AutoCad files), select “Drive recovery using selected file types” and select each type.
Click Start.
Partition Recovery
Recover My Files scans the drive looking to locate missing partitions. This will take less than 20 minutes. At completion partitions found are rebuilt and displayed. If you files are found, stop the search and save files.
Searching block xxx of xxxx
Recover My Files starts a search for Lost Files (a sequential search for headers). Click on Lost Files to preview their content.Watch the “Files and Folders” number near the progress bar. If this number goes up high and remains stable, note down the block number that the search is up to, skip the remainder of the search phase and the file and folder structure will rebuild.
Review Search Results
Review the search results. Use different views (e.g. Folders, File Type, Recovered, and Gallery View). Expand folders and click on files. Do jpegs and documents preview in the display window? Determine from the results if you wish to save the files?
Save Listing of Results
Consider saving a list of the search results as a .rsv file that can be quickly loaded at a later time.
Purchase a Key
Purchase a software license key at www.recovermyfiles.com. Key is provided on a web page at the end of the purchase process and also by email.
Online Activation
Is the PC online? Open the software activation window. Enter the software activation key.
Offline Activation
If PC not online, use another internet connection for offline activation process.
Select Files to be Saved
In the search results window, select the files to be saved (tick the boxes). Select those files which preview OK. Check space required to save files.
Save Files
Press save files button and select the destination drive. Files must be saved to a different drive. Click OK to start the save process.
Review the Saved Files
Check the destination drive to ensure that the files have saved correctly. Open and test files with their creating applications (e.g. Word, XLS).
Files are recovered
Once you have confirmed that your data has been successfully recovered, assess what you now wish to do with the problem drive. E.g. Use Windows to copy the recovered files back onto it, or replace the problem hard drive with a new drive.
9.3 Before you begin
Is the drive physically OK?
Check that your problem drive is mechanically functional. If it is making a loud grinding or clicking noise then it is likely that it has suffered physical damaged. It should be powered off immediately and assistance sort from a hardware data recovery service.
Check the status of the drive in Windows Disk Management (in Windows 7, right click on My Computer > Manage > Disk Management). At a minimum you should see the physical disk listed:
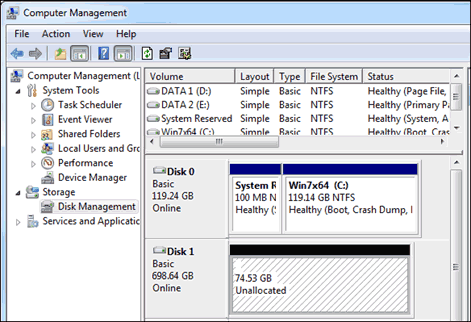
Consider the best way to connect the drive to run the recovery
Avoid writing any new data to the drive. If it is your current C: (e.g. you have reinstalled or re-set Windows) you may consider connecting the drive to another PC as a secondary drive and then using that computer to run the search (making it less likely that new data will be written to it).
In critical situation, you may also consider taking a disk image (a sector by sector copy of the entire disk) and working on the image rather than the original drive. See Chapter 14 for more information.
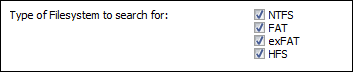
Do you know what type of file-system you are trying to recover?
If you know the type of file-system that you are trying to recover, e.g. NTFS, FAT, exFAT, HFS, EXT, you can specify this in program options before your run the search. This can increase search speed and also simplify search results by not including unwanted data. Select Options > Search and specify the File-system type (![]() Only change this option if you are sure of the file-system type to be recovered).
Only change this option if you are sure of the file-system type to be recovered).
Review your PC power settings
When running a Recover Drive search it can be advantageous to boost your PC power settings so that problems are not encountered with drives powering down during the recovery or the save process. See Chapter 7 for more information.
Running the Recover Drive search
To recover a drive:
Run Recover My Files. In the wizard, click the "Recover Drive" icon (if the Wizard screen is not open, click the Start icon in the toolbar) and click the Next button ;
In a “Recover Drive” it is best to search s Hard Disk rather than a drive letter (Only search a drive letter if you problem drive contained multiple partitions, e.g. drives E:, F:, G: and the problem relates to only one of the drive letters). In the drive selection window, highlight a Hard Disk to search and click the Next button.
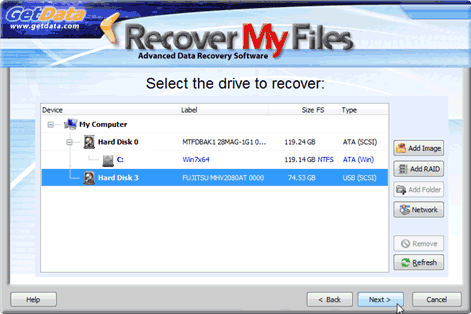
The Device Selection window includes the following information:
|
Label: Physical drives are listed with their Windows device number. Size: The size column contains the size of the physical or logical device. Note that the actual size of the drive is usually smaller than what the drive is labeled. Drive manufactures usually round up the drive capacity, so a 453.99 GB drive in this screen may be sold as 500GB. FS: The File-system on the drive, e.g. FAT, NTFS or HFS; Type: Describes the way in which the drive is connected to the computer.
|
![]() Drive not listed: See 11.1 - Troubleshooting drive selection.
Drive not listed: See 11.1 - Troubleshooting drive selection.
![]() Working with image files: See 14.3 - Recovering data from an image file.
Working with image files: See 14.3 - Recovering data from an image file.
The drive recovery options windows asks the user to select between an automatic or manual recovery:
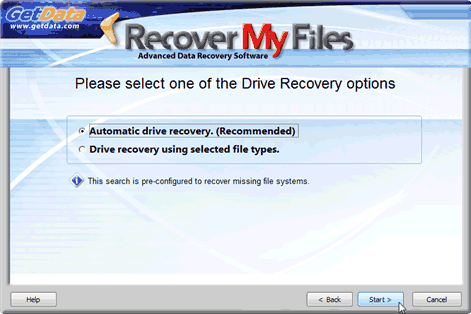
The selection in this window configures the search for lost files. Lost files are found by a sequential search of the drive unique file signatures (learn more about lost files at the beginning of this manual in Data Recovery Fundamentals). Lost files assist Recover My Files to locate and rebuild the folder and file structure. The options are:
Automatic drive recovery
An “Automatic Drive Recovery” uses pre-selected common file types (Avi, EXE, iTunes, Jpeg, xls, xlsx, doc, docx and Zip).
Drive recovery using selected file types
A “Drive recovery using selected file types” allows the user to manually select the file types to assist in locating the missing file and folder structure. It is suggested that you only use this option:
If the problem drive does NOT contain some of the pre-selected common file types (described in the “Automatic” option above). For example, if the problem drive contained only HTML files, it is best to manually select the HTML file type; or
The drive contains common file types, but you are specifically looking additional file types not in the common list, such as .qbb or .dwg. In this case you would manually select the common file types and add the additional.
The benefit of manually adding a file type is that in addition to helping locate the file-system records, you are simultaneously searching for the lost files by type. If the original file and folder structure cannot be recovered (it may be overwritten or corrupt), you may still recover file content as a Lost file.
The disadvantage of a adding many file types is that each addition type requires additional processing time and it will slow down the search. We suggest that you do not select more than 10 file types at any time.
Once the required selection has been made, press the Start button to begin the search.
9.5 Search Progress
A Recover Drive search runs in phases. The search phase is identified by text above the progress bar. The phases in the search will be dependent on any search options set (e.g. Options > Advanced > Run a Lost Files search only). The following describes a Recover Drive search with default options.
Phase 1 of 5: Searching for known partitions
Phase 1 of the Recover Drive search identifies the configuration of the existing drive. Recover My Files examines the MBR (Master Boot Record) and other system files to determine the type of file-system currently installed and the drive parameters. Phase 1 is a very fast and is complete within a few seconds.
Phase 2 of 5: Partition Recovery
Phase 2 of a Drive Recovery attempts to locate missing partitions. Recover My Files performs two separate passes down the drive looking for partition tables. Typically this part of the search will take less than 20 minutes. Partitions located are rebuilt in the next phase.
Phase 3 of 5: Rebuilding partitions
Partitions located in phase 2 are rebuilt and displayed in the search results screen in phase 3. They are created using the naming convention:
[Partition Type] Partition @ [Starting block number] [Drive label]
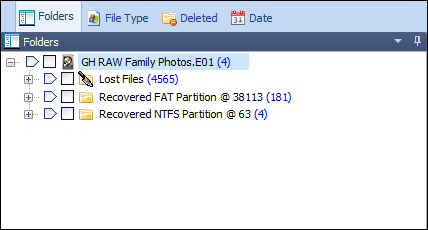
An example of a recovered FAT partition is shown in Figure 59 below:
Figure 59, FAT partition located in Stage 1 of a Recover Drive search
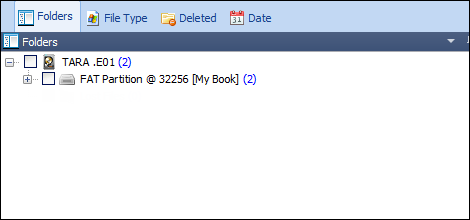
Once added, a recovered partition can be browsed even as the search continues. Click the ![]() icon to expand the search results. Use the different data view and sort and filter functions (see Chapter 6 for more information) to determine if the missing files have been located.
icon to expand the search results. Use the different data view and sort and filter functions (see Chapter 6 for more information) to determine if the missing files have been located.
![]() If relevant files and folders are located in a partition the remaining search phases can be skipped and files saved. See Error! Reference source not found. below for information on how to skip search phases. See Chapter 10 – Saving Files for more information on validating search results and saving files.
If relevant files and folders are located in a partition the remaining search phases can be skipped and files saved. See Error! Reference source not found. below for information on how to skip search phases. See Chapter 10 – Saving Files for more information on validating search results and saving files.
Phase 4 of 5: Searching for “Files and Folders” and “Lost Files”
Phase 4 of the Recover Drive, “Scanning block xxx of xxx …” is a sequential search for “Files and Folders” and “Lost Files”.
![]()
Lost Files
As Lost files are by file signature they are added to the “Lost Files” folder in the results screen and are immediately available to be previewed. Their preview confirms that Recover My Files is successfully reading the drive. However the value of Lost files is limited because although they contain file content, they do not have their original file name. Their principal use is to assist to locate Files and Folders (described below).
Files and Folders
Scanning for Files and Folders and Lost files over a large drive can be a long process:
Knowing when to best stop this phase can save many hours.
“Files and Folders” are recreated from individual file-system records (e.g. FAT or MFT records). File-system records for a drive which has lost a single partition are usually clustered at the start of the drive, i.e. within the first 30,000,000 blocks. In most drive recoveries, the complete file and folder structure will be found early in the search (within the first 40 minutes). Once the file-system record have been located, the file and folder structure can be rebuilt an all files can be located without the need to scan the entire drive.
To rebuild file and folder structure:
1. Watch the “Files and Folders: xxxxx” number near the progress bar. When file-system records are found this number will rise sharply (each item is an individual file or folder) and then remain stable;
Note down the approximate block number that the search is up to (a subsequent search can be started from this position if required) and press the Skip button:
![]()
The following window will appear:
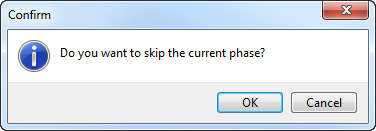
3. Click OK and skip to phase 5.
Phase 5 of 5: Rebuilding “recovered partitions”
Phase 5 of the search is the rebuild of the file and folder structure. Depending on the number and complexity of file-system records located, this phase of the search may take up to 45 minutes. It is not possible to skip this final phase.
Results are added as Recovered Partitions in the following format:
Recovered [File-system type] Partition @ [starting block]
as shown in Figure 61 below:
Click the ![]() icon to expand the search results. Use the different data view and sort and filter functions (see Chapter 6 for more information) to determine if the missing files have been located.
icon to expand the search results. Use the different data view and sort and filter functions (see Chapter 6 for more information) to determine if the missing files have been located.
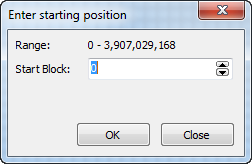
9.5.2 Running a Recover Drive search from a specific block
If the recovered partition does not contain your missing files it is possible to continue the search from the block at which the previous search was stopped.
1. Select Options > Advanced > and select “Prompt for start block”, and “Run a lost files search only”. Start a Recover Drive search and proceed through the wizard steps. Start the search and when prompted, enter the starting block;