Chapter 8 - File Recovery
Online Manual
Frequently Asked Questions
Data Recovery Basics
Chapter 1 - Introduction
Chapter 2 - Evaluation
Chapter 3 - Installation
Chapter 4 - Purchase
Chapter 5 - Activation
Chapter 6 - User Interface
Chapter 7 - Best Power Settings
Chapter 8 - File Recovery
Chapter 9 - Drive Recovery
Chapter 10 - Saving Files
Chapter 11 - Troubleshooting
Chapter 12 - Options
Chapter 13 - Raid Recovery
Chapter 14 - Disk Imaging
Chapter 15 - Customizing GUI
Chapter 16 - Legal
Appendix 1 - Technical Support
Appendix 2 - File Carving
Appendix 3 - References
Appendix 4 - Definitions
Appendix 5 - Icon Key
8.1 File Recovery Quick Start
Use this flow chart to recover deleted files that have been deleted and emptied from the recycle bin.
(Note: If you have a formatted or corrupt drive, refer to the flow chart in Chapter 9).
START
Deleted files, emptied from or bypassed Recycle Bin, deleted by a virus or Trojan, or lost by some other means.
Minimize Disk Usage
Minimize the use of the problem hard disk. If the disk is your current C: drive, consider connecting the drive to another computer as a secondary drive to run the recovery.
Review Your PC Power Settings
Consider changing PC power settings to “High Performance” for data recovery (see Chapter 7)
Download Recover My Files
Download and install Recover My Files. Preferably install on a different hard disk.(See Chapter 3)
Run Recover My Files
In the wizard window select “Recover Files”. Click Next.
Select the Drive Letter
In the drive selection window, select the problem drive letter.Click Next.
Select “Search for Deleted Files”
Click Start
Review Search Results
Use different views (e.g. Folders, File Type, Recovered, Gallery View) to locate your files. Do jpegs and documents preview in the display (bottom) window? Use the Validate Files button to validate the results. Determine from the results if you wish to save the files.
Need a more thorough search? Start a New Search
Search for “Deleted and Lost Files”. Select required file types. Click Next
Save List of Search Results
Consider saving a list of the search results as a .rsv file that can quickly be loaded at a later time. Use the "Save Session" button to do this.
Purchase a Key
Purchase a software license key at www.recovermyfiles.com. Key is provided on a web page at the end of the purchase process and also by email.
Online Activation
Is the PC online? Open the software activation window. Enter the software activation key.
Offline Activation
If PC not online, use another internet connection for offline activation process.
Select Files to be Saved
In the search results window, select the files to be saved (tick the boxes). Select those files which preview OK. Check space required to save files.
Save Files
Press save files button and select the destination drive. Files must be saved to a different drive. Click OK to start the save process.
Review the Saved Files
Check the destination drive to ensure that the files have saved correctly. Open and test files with their creating applications (e.g. Word, XLS).
Files are recovered
Once you have confirmed that your data has been successfully recovered, assess what you now wish to do with the problem drive. E.g. Use Windows to copy the recovered files back onto it, or replace the problem hard drive with a new drive.
8.2 When to use a File Recovery search
A "Recover Files" search is best used when:
- individual files have been deleted and emptied from the Windows Recycle Bin;
- files have been deleted and bypassed the Windows Recycle Bin;
- files have been deleted by a virus, Trojan or worm;
- a file of the same name has saved over another important file;
- Files have been lost by some other unknown cause.
8.3 Before You Begin
Deleted files will remain on a computer up until such time as they are overwritten by new data. For this reason you should minimize the use of the drive on which the files were lost until such time as you have had the opportunity finish your data recovery.
Recovering Data from a C: Drive
Your C: drive is the most vulnerable to new data simply because it is where Windows is running. If practical you may consider connecting the drive to another PC as a secondary and then using that computer to run the search. In critical situation, you may also consider taking a drive image (a sector by sector copy of the entire drive) and working on the image rather than the original drive. For more information see Chapter 15 – Drive Imaging.
Many users may not have the available resources to move the hard drive to another computer. Recover My Files is a relatively small program (less than 20mb), so whilst installing on the problem drive is not ideal, it is a limited risk.
Review your PC power settings
When running a Recover Files search it can be advantageous to boost your PC power settings so that problems are not encountered with drives powering down during the recovery or the save process. See Chapter 7 for more information.
8.4 Running a Recover Files search
To run a Recover Files search:
Run Recover My Files. In the wizard, lick the "Recover Files" icon (if the Wizard screen is not open, click the Start icon in the toolbar) and click the Next button:

In the drive selection window highlight the drive letter from which the files are missing and click Next.
![]() Drive not listed: See 11.1 - Troubleshooting drive selection.
Drive not listed: See 11.1 - Troubleshooting drive selection.
![]() Working with image files: See 14.3 - Recovering data from an image file.
Working with image files: See 14.3 - Recovering data from an image file.
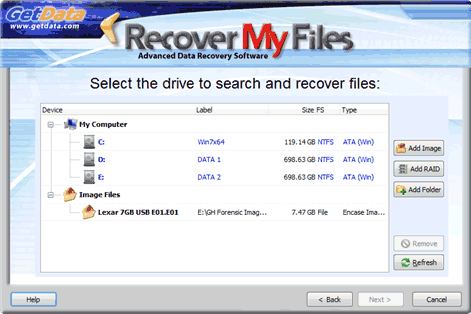
The Device Selection window includes the following information:
Label: Physical drives are listed with their Windows device number. Logical drives display the drive label (if no label is present then "{no label}" is used).
Size: The size column contains the size of the physical or logical device. Note that the actual size of the drive is usually smaller than what the drive is labeled. Drive manufactures usually round up the drive capacity, so a 453.99 GB drive in this screen may be sold as 500GB.
FS Type: The File-system on the drive, e.g. FAT, NTFS, HFS. Describes the way in which the drive is connected to the computer.
Select the File Recovery options:
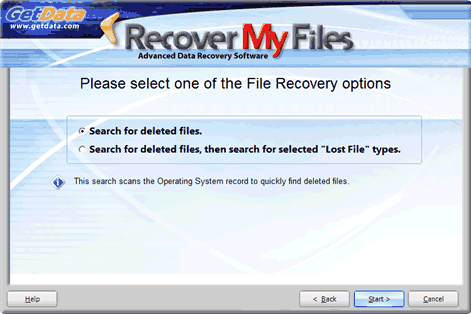
Search for Deleted Files
Each file on a Windows computer has a record in the file-system index (e.g. the FAT or MFT). When a file is deleted, the record is updated with a deleted file marker. The clusters on the drive used to store the file data are now considered unallocated (i.e. available for new storage). However the file content remains in those clusters. A search for deleted files reads the entire file-system index, including records for deleted files, and displays the file content.
To search for deleted files:
- Select the “Search for deleted files.” option;
- Click the Start button.
Recover My Files will then commence to read the file-system. This search will take less than 20 minutes to complete. At the completion of the search review the search results as described in 8.5 below. If files are NOT found, try the option to “Search for deleted files, and then search for selected Lost File types”.
8.4.2 Search for deleted files, then search for selected “Lost File” types
As the name suggests “Search for deleted files, then search for selected “Lost File” types” runs the search for deleted files (described above), then sequentially scans the remaining area of the drive for "Lost” files.
A lost file is a file that is located by file carving. File carving is a sequential search of the drive to find file headers for the specified file types. Learn more about lost files at the beginning of this manual - Data Recovery Fundamentals. This search should be run when:
- The "Search for deleted files" option did NOT find the missing files;
- When you wish to be certain that all possible data on the drive is located and recovered.
To search for deleted and lost files:
- Select the “Search for deleted files, then search for selected Lost File types” option and click the Next button (shown in Figure 49). The file type selection window will open:
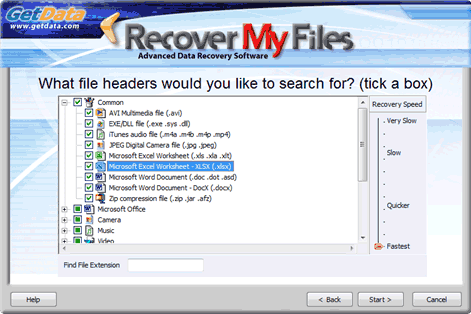
- Place a select tick in the box next to the file types that you wish to recover. The file types in this list have a known structure that can be identified if found on the drive (a full list is provided at Appendix 2 - File carving). To search for a file type, type the extension into the “Find File Extension” search box.
Important: The more file types that are selected, the more resource intensive is these search and the longer the search will take. It is suggested that you do not perform a Lost File search for more than 10 files at any one time. A sequential search of a large hard drive, e.g. 2TB or more containing many files may take up to 24 hours. - Click the Start button to commence the search. A search for deleted files (described in 9.2.1 above) will commence.
- The start of the lost files search is indicated by the message "Scanning block xxxxx of xxxxx for lost files" above the progress bar.
- Lost file are placed in the Lost Files folder. As the search progresses, review the search results (as described below). If the missing files are located, stop the search and save the files.
8.5 Recover Files Search Results
Click the ![]() icon in the search results screen to expand folders. Use the different data view and sort and filter functions to determine if the missing files have been located (see Chapter 6 for more information).
icon in the search results screen to expand folders. Use the different data view and sort and filter functions to determine if the missing files have been located (see Chapter 6 for more information).
In the search results screen deleted items are identified by the following icons:
![]() Deleted folder
Deleted folder
![]() Deleted file
Deleted file
![]() Lost file
Lost file
The available data views are summarized as follows:
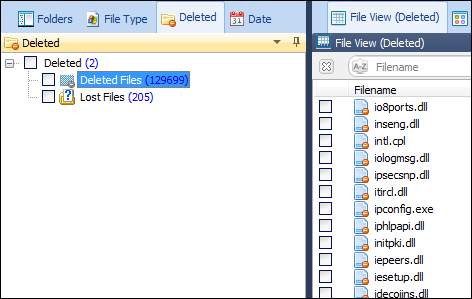
Deleted view
The Deleted view is a fast way to locate relevant files as it shows only deleted files. The folders in the deleted describe the way in which each of the deleted files has been identified, i.e. “Deleted” or “Lost”.
Figure 51, Tree pane, Deleted view
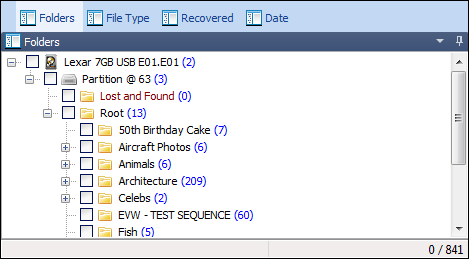
Folders view
The Folders view shows all files and folders on the examined drive. The “Root” folder contains the existing folder and file structure on the drive. Deleted files and folders are located inside the Root folder and should appear in their original location prior to delete. Lost and Orphaned files are placed in their own folders under the partition in which they were found.
Figure 52, Tree pane, Folders view
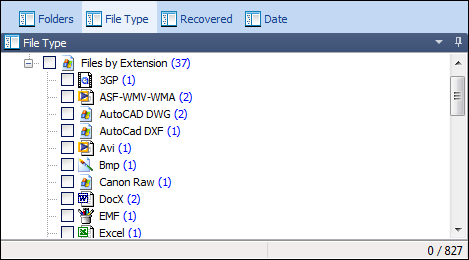
File Type view
The File Type view sorts files by extension. This view shows all files on the examined drive. Select a file type, and then look for the deleted file icons. It is also helpful to sort by the “Is Deleted” column in this view.
Figure 53, Tree pane, File Type view
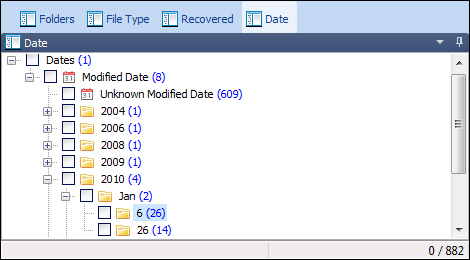
Date view
The date view groups files by date. This view shows all files on the examined drive. Look for the deleted file and folder icons.
Figure 54, Tree pane, Date view
Validating search results and saving files
To learn how to validate the search results and save files, see “Chapter 10”.